Mushroom Powder Experiment

In a post by “Fern and Fungi” they talked about making mushroom powder. I had a container of dried mushrooms from Costco and it gave me the idea to try it myself! The mushrooms were different and I didn’t forage them myself but I was hoping to make something similar. More to add the mushroom flavor I love to our food more than anything else with these particular mushrooms. My plan is to add the powder to sauces, bread, soups, etc. I already use the liquid used to rehydrate these mushrooms in meals so why not add it all?

Screenshots I took:

I thought the mushrooms might not be dry enough to powder and it was suggested in a group I help run that I dry them more. I decided to precut them with scissors before I did this to get them dried more evenly in smaller bits. However, I found most crumbling with the rough handling and scissors. So instead I added maybe 1 cup or so at a time to our Vitamix to blend and blended it on high. Emptying after each cup of whole pieces. Worked great! I’d say if you wanted it finer you could sift it but this works for us.

The bit left in this container made quite a bit of powder! I think this will last us longer than throwing in a bunch of mushrooms when I need a last minute addition to a meal. It also made the mushrooms more versatile in a sense instead of just a chewy ingredient in a typical soup or stir fry.

I’m hoping this year to forage more for mushrooms (come on morels!) and buy locally at farmers markets to dry myself for future powders. Making the powder much more nutritional than just for taste. This was a super easy and simple way to get started though! Just watch out for clouds of powder when you take the blender lid off!

I included pictures of the container of mushrooms I purchased at the end for those curious. Not the ideal mushrooms for anything other than good flavor. I put some in leftover soup tonight along with dried nettle and it deepened the flavor and made it more rich. Very satisfying dish!

Homesteader or Homemaker?

I’ve been thinking about my page and blog a lot lately. I haven’t lived up to what I wanted to do. Post-partum depression, difficulty with two children alone for the most part (military family), discovering my eldest has special needs, not being able to find a home that meets what we require, etc. I see that my work is that of a homemaker and not a homesteader quite yet. Though, I came into this as an aspiring homesteader and made that clear to start. I had expected to be where I wanted within a year of when I started this blog but it hasn’t happened yet. Luckily, it has helped me make friendships and connections, pushed me to work harder, opened doors to more writing, etc so there are positives! This year has been rough and left me with a few health issues to end the year with. I keep moving forward and trying not to let them hurt the life I want.

Currently, we have started working on finances for a home and have been actively looking for and viewing homes. There isn’t much this time of year but I now know that things will open up around the start of Spring. Our toddler gets daily therapy for autism and will attend a program/preschool developed especially for autistic children next year and a move too far away from services has become a new issue for us. Before we saw a bit of a commute into nature more our style. Funny how life changes things. How we have to adapt to things that come our way. Though I always knew I’d put my family first.

I’ll keep promising a better blog to share and a future for us until I get it. For now I hope you can find inspiration in the small things I have to share.

Crockpot Apple Butter

One of the great things about where we live is the close proximity to hot off the farm food. We recently bought our weight in a variety of apples and weren’t eating them quickly enough. The first thing I decided to do was make crock pot apple butter. I don’t utilize this glorious kitchen gadget often enough and this was a nice easy way to use up some apples. I didn’t need to stand and stir, watch for bottom of the pan burning, etc. All I needed to do was some prep work.

The recipe below is more than enough for my family of two adults, a toddler and a baby who is old enough to eat solids (aka not solely breastmilk or formula fed). It fit nicely in my crock pot to start and cooked down with plenty of room to mash it up without a mess.

You will need:

*Approx. 2.5-3 apples (look below for chart)

*1/2 cup white sugar (or use what you prefer)

*1/2 cup brown sugar (or use what you prefer)

*1 tablespoon vanilla extract (I used homemade)

*1 teaspoon cinnamon

*1/4 teaspoon clove

*1/4 teaspoon salt

Optional:

*1-2 tablespoon apple cider vinegar or spiced alcohol

*1/4 teaspoon ginger or replace all spices with pumpkin pie spice

*honey or maple syrup to taste or to replace sugar

I found this handy guide via Google if you don’t have a scale to weigh apples:

Peel, core and chop all apples and add to crock pot.

Add all other ingredients including optional ingredients (if using store bought vanilla extract I would wait to add this until you mash the apples).

Mix well then set lid on to cook on low for approximately 10 hours. I tend to just leave it for the day then switch the heat setting before bed.

Stir occasionally.

Turn onto warm overnight. In the morning or after 8 hours or so check on contents to see if the mixture has cooked down well and browned. Turn off, remove lid and let cool for 30-60 minutes before continuing. You can add imitation vanilla extract, etc at this time. You can alternatively cook on low a few extra hours instead but I like it all to stew together as long as possible.

Mash contents up using a whisk or potato masher. Alternatively, purée in blender in small batches or use an immersion blender. I have also seen people blend down the apple mixture raw before cooking. Some even include the peel to create less waste and for any additional benefits the peel may have (still core and chop apples).

Now you can add your mixture to jars, Tupperware, etc. It freezes well! Use on toast, in cookie cups, as a cake filling, etc!

Enjoy!

Turmeric Powder Tincture 

When I first met my now husband he introduced me to herbs to help with skin issues. He suffered a skin injury that required almost a year of medical attention but wanted to help his skin in any way he could. So he looked to herbs. The best way to get the herbs he chose to help in his opinion was to ingest them. Now we use many of the herbs he loved in our food and tisanes frequently. Turmeric is one we go through a lot of. It helps with inflammation and many skin issues are the product of other health problems such as this. Check out the link at the end of this post for more in depth information.

When a neighbor/friend asked if I wanted her bag of turmeric she didn’t like (it has a peppery taste that isn’t appetizing to some) I started brewing up ideas for usage. More than putting it in almost everything we eat. Which poses an issue with my toddler who ends up staining her clothes with any food saturated with it. I decided the first thing I wanted to make with it was a tincture. 

Most recipes I found suggested using the root. Fresh or dried in slices to help the alcohol base saturate it more easily. Well, I didn’t have a root. I had powder. So I did a 1:5 concoction to test it out. 1 part turmeric powder to 5 parts alcohol. It worked great! It was also really fun to work with and see the lovely color changes. The powder is a gorgeous yellow color and once it settled it created a red hued liquid. Later I saw it was more orange when not stacked the way it was but still lovely. 

One small pint jar creates a ton of tincture in my opinion. So unless you have a large family using it, are taking the tincture several times a day or are creating to share this should work great to start with. I filled two 2 oz dropper bottles to last me a while and barely made a dent in the tincture. I left the rest to continue brewing until I needed to strain some off again for use. 

This is what I used: 

I filled roughly 1/5 of the jar with powdered turmeric then filled it up with the alcohol.

After mixing gently and being sure to scrape any bits off the bottom I noticed the amount of product went down.

So I topped it off with a bit more alcohol. 

Then I added the lid and shook it up! Making sure to get any clumps out. 

It WILL settle and you will notice that it may look something like this:

It will definitely still brew perfectly fine so no worries! What you need to do though is shake vigorously every day at least once until the day before you decide to strain it. 

Typically, you would leave this for 14 days then let it rest on the 15th day before straining. That’s the bare minimum needed. I let mine brew for almost 3 months. Many saw the longer the better with tinctures. 

When the time came to strain I got out my sterilized bottles, a funnel, a bowl to catch any spillage, a measuring cup and a magic eraser sponge because I’m bound to spill something! 

I poured off some of the liquid from my jar into a measuring cup. Purely for the ease of pouring from it. I made sure to let the jar settle so I would get the least amount of powder in as possible. You can strain your concoction if you wish but I found that powders can be tricky business to work with. So I decided to use just the liquid from the top of the jar. 

Once I filled my bottles I put the leftover tincture back in the jar to save for a future pour. Letting it continue to brew.

I put some in my iced tea to test out immediately. A few drops definitely effects the flavor! If it’s too much to sip a drink with it then use the dropper to squirt directly into your mouth then chase with a drink or food if needed. Or add it to your food. 15-30 drops a day up to four times a day is the highest recommended dosage. Though I am not a doctor or certified herbalist so please do your own research! 

I then labeled my bottles and put the jar back in the dark cupboard. 

For an in depth look at the uses and side effects of turmeric feel free to check out this article: http://www.m.webmd.com/vitamins/ai/ingredientmono-662/turmeric

Calendula Tincture

I have always had an interest in herbalism. Over the years I have made healing foods and drinks, natural bath/body and home products, blends for various uses, etc from store bought, Wild harvested and home grown goods. My husband says plants are my thing (his are crystals/stones/minerals). I tend to focus on certain skills and crafts for extended periods of time and recently pulled out of a crochet mania to study and “play” again. A really great herbal magazine and family herbalism course came into my life at the same time my mind started to wander back and I took it as a sign. 

One of the first things I did was start making tinctures. Inspired by the course I started first with vanilla extract. I want that to brew for a longer period than the minimum suggested so instead I am turning to what I started next for my first blog on the subject. A calendula tincture. 

I have various skin issues that have been with me for much of my life. It’s a combination of genetics, diet and potentially other issues such as inflammation. I looked into breastfeeding safe herbs I could ingest as part of a regime to heal myself and calendula came up as an option. I had just enough for a small batch and got towork! 

Some uses of calendula can be found here: https://www.google.com/amp/s/draxe.com/calendula/amp/

I took my dried calendula I put in my tea and crushed it a bit in one of my mortar and pestles. 

It came out to just over 1/2 cup not being pressed down or fully powdered. I considered it half a cup. 

I then added a full cup of 100 proof vodka (80+ is best though some say 90+ proof). For this particular plant it was suggested to do a 1:2 ratio. Others may be different so look into different information on plants if you plan to make a tincture. Some dried herbs suggest adding distilled water but for this I decided not to. 

I put the ingredients in a jar and stored in my herb cupboard. It is preferred not to have air space like mine but it wouldn’t fit into any other jars I had so I took a chance. It turned out fine. I probably wouldn’t risk it again however. 

I shook it every day for the period I had it brewing. Then I let it sit undisturbed 24 hours before straining. The minimum suggested is 2 weeks of shaking plus 1 day of rest. I left mine for almost a month and strained right before the New Moon. I may be a Heathen but I have a witchy side as well. The longer the better is a general rule for tinctures. 

Once done I strained it in a plastic strainer. I have seen suggestions not to use any metal so I take that advice. 

The herbs really soak up a lot so I would pressed it out well, let it rest then go at it again. 


My funnels have not yet arrived so I placed the amber glass bottle in a bowl to catch any of the tincture that might spill and used a measuring cup to pour. 

I put the tincture in several smaller bottles (2oz) but any size or amount works. I bought mine off of Amazon but usually buy locally despite the large price difference. 

Label with the name and date bottled! My handwriting is awful. I use tape to stick paper on mine but you can get fancy with special labels! 

Tinctures last several years if stored properly. I’ll be adding a few drops a day to coffee or tea daily. Starting off small and building up to more drops as this is a new-to-me tincture. You can take directly on the tongue or add to food or drink like I do. 

Be sure to look out for future tincture and herbalism blogs! I’m only an aspiring herbalist so please do your own research!

Natural Bug Repellent 

In a group I help run I posted about a natural bug (and arachnid) repellent I was making for our porch and patio today. It was essentially half my essential oils and a stick of cinnamon I soaked in a half and half vinegar/water mix. There are many different oils and herbs one could procure to help ward off a variety of bugs without chemicals. 

Some of these include:

*Lavender

*Citronella

*Lemongrass

*Tea Tree

*Eucalyptus

*Mint (any kind)

*Marigold

*Geranium

*Cedarwood

*Rosemary

*Citrus – Lemon, Lime, Orange, Grapefruit, etc. 

*Cinnamon

*etc. 

I usually do a mix of what I have on hand to ward off different types of bugs but if you have a specific pest you can easily find specific herb/s for them.

After I have made my repellent I either add a cup to a gallon of water and wash the porch with it or I put it in a spray bottle and spray around door and window frames, etc. I would avoid getting this near your plants. If you have children or animals I would spray where they can’t lick or touch it and/or use only safe ingredients that won’t harm them if accidentally consumed.

If I’m making something for the skin I use half witch hazel instead of vinegar and put it in a spray bottle. Be careful not to spray too close to clothing as it can stain. Spraying on shoes or socks before a hike is helpful. 

Alternatively, you can add a 2% dilution of these oils to body lotion and do a rest patch to make sure you are not allergic. Please look into the properties of the oils before attempting this. I am just giving suggestions as a place to start researching. 

Here is a basic bug repellent I used to make: 
Witch Hazel soaked in fresh Geranium and Marigold (then strained!), Spring Water, Essential Oils of Lavender, Peppermint, Lemongrass, Eucalyptus, Tea Tree and Citronella. 

I don’t have the exact amounts as I do things as I go without recipes half the time. I would still make a 2% dilution of the oils. The herbs should be soaked 1-2 weeks. Dried works as well. 

I hope this proves helpful in the warm months ahead! 

Steel Cut Oat and Honey Bread

If you have read some of my older blogs you would know we like to buy in bulk and store food in glass jars. My husband bought me the “Outlander Kitchen” (http://outlanderkitchen.com) book last year and with it a ton of oats. Then he went to sea and I had no one to cook and bake for. I was pregnant and had no appetite most of the time and even though my family loves my food I felt insecure in giving it away to others with different tastes. So I didn’t use much. I had my baby at the start of the year and decided to finally start using it up. Here is one recipe I wanted to share (not from “Outlander Kitchen” just FYI)! Steel Cut Oat and Honey bread! It’s a bit crumbly but delicious! You can easily add to it as well. Add in raisins, chocolate chips, spices such as cinnamon, etc. You can top it with a glaze, honey butter, chocolate drizzle, etc as well. I made mine “plain” to show you a good starting point. It doesn’t taste plain at all though! You can easily use this blend in muffin tins as well for individual treats. 

You will need: 

*2 1/2 cups unbleached all purpose flour

*1 cup steel cut oats (I used quick cook but both work)

*1 cup boiling water 

*1 egg

*2/3 cup milk (I used cashew)

*1/4 cup honey (at least!) 

*3 tsp baking powder

*1 tsp salt 

*1/2 stick butter (or 4 tablespoons oil of choice)

*butter, cooking spray or whatever you prefer to grease your bread pan

Take oats and add boiling water to them in a heat proof bowl. 


Let sit for an hour for quick cook or two hours for regular steel cut. 

Start to preheat oven to 350 degrees Fahrenheit as the next steps will go quickly. 

Melt butter and honey on low while stirring continuously. I used a whisk (my tiny one ran off with my toddler).

When the honey and butter are fully melted and combined add the mixture to the oats and blend together. 

In a separate bowl mix the dry ingredients fully.

Add milk to the oat blend before dropping in the egg. Mix well. 


Add the wet and dry ingredients together.

Here I used my Kitchen Aide as my kid likes to watch it work) but you can mix with a spoon. Mix until just fully blended. Do not overwork it. 

Grease bread pan and pour in mixture. 

Shake gently and then slap against the counter to even out the dough and have it fill in any gaps. 

Bake for an hour on the center shelf. Some ovens may require a little more time. Use a knife to check to make sure the dough is baked through. 

Immediately take out of the pan to cool. You can top it now if you wish or don’t top it at all. I used salted butter as it brings out the flavor. 

Let cool fully then slice and enjoy! 

Checking In – Life Update

Though I have decently kept up the Instagram and Facebook page for “The Heathen Homesteader” I have completely neglected the (this) blog (and the accompanying Twitter and Tumblr. Oops.). I got pregnant with my second child last year and my brain power and energy went down the drain. I thought that once I had the baby I could get back to work but now I’m even more tired. Parenthood is no joke! It’s difficult but worth it. 

I wanted to take a moment to check in however. To let you all know I am still here and don’t plan on abandoning this project of mine. I just need time.

Also, meet Wilhelmina “Mina” Johanna! She was born on January 3rd and weighed 10lbs 14oz. 

She’s about 16lbs now at a little over 2 months old. 

Her big sister Dagmar absolutely adores her and smothers her with love. 

So you can see I have my hands full! Literally. 

Working on a recipe today for an oat bread and I hope to be able to share it as soon as I can. Thank you all for your continued interest in my work and your support. 

A Year Of Crochet 

In November I celebrated one full year of learning crochet. It was an on and off journey as I had other crafts I enjoy that I would spend long periods of time on instead. With the holidays coming up and a husband that was at sea I decided several months ago to focus almost solely on crochet. It was the craft I know most people I was going to give gifts to would enjoy. I also snuck in quite a few things for my toddler and baby that is on the way. The more I made the more I learned. I progressed and learned more about crochet in the last month than I have learned the rest of the time I have been learning. I can now read patterns a bit better and am more confident in my abilities as well as what I know I can tackle. 

Here are some of the things I have made recently:

I can’t wait to continue this journey and expand my knowledge and experience. I’m hoping with two little ones I’ll have plenty of projects year round to work on for them and others. Mamamade goods they can give their own kids should they choose to have any. 

To see more pictures and updates find me on: 

Instagram: theheathenhomesteader

Facebook:

http://www.facebook.com/theheathenhomesteader

Crispy Pumpkin Seeds Recipe

Pumpkin seeds are probably my favorite thing about taking apart pumpkins. Sure, purée is amazing when you are using sugar pumpkins but making Jack O’ Lanterns and other decor you won’t be eating makes the work somewhat of an unrewarding job when cleaning them…except for the seeds! It is a long and time consuming process but so worth it! I might have cried when I burnt a batch before. Seriously. 

The other day, I cleaned out the “guts” from a sugar pumpkin destined to be purée. To start you simply need a pumpkin and to use whatever method you decide on to remove the guts. It depends on what you’re doing with your pumpkin. So we will start with the guts. 

You will need:

*Pumpkin guts! These are the stringy fibers and seeds. 

*Salt

*Oil

*Seasonings of choice. You can make salted, cinnamon sugar, cayenne, pumpkin spice, etc. Here I am making salted because they are my favorite. 

*Tools such as bowls, strainer, spoon, etc. Read the entire recipe before beginning to make sure you have everything you need! 

Pull seeds out of pumpkin fibers. Toss or compost the fibers. This is time consuming, slippery and messy so take your time. They don’t need to be perfectly clean. 

Soak seeds overnight in salted water. This is a method my mom taught me. They somehow create crispier and more flavorful seeds as well as helping prevent sticking a bit. 

Strain seeds. Rinse if you are making sweet seeds to remove salt. Most of the extra fibers should slip off of the seeds and stick to the strainer as well. Thanks salt water! 

Place in a flat container to dry. This can take several hours depending on the amount of seeds in the container, temperature in the home, etc. You can see some extra fibers here. Remove them or leave them. They don’t hurt the seeds. I wouldn’t use paper towels or a rag to help. The seeds will stick to it! Which is a PAIN to deal with later. I prefer waiting over using the oven to dry the seeds. 

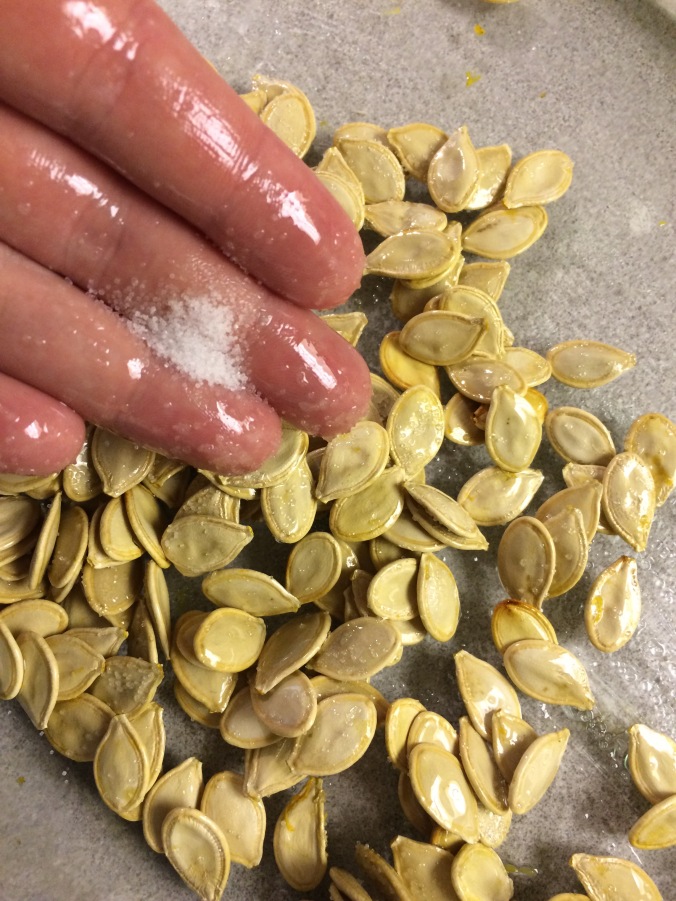
Once dry cover with just enough oil to wet the seeds. I prefer to use my clean hands to massage the oil in and around. 

Add seasonings and toss the seeds. 

Roast in the oven at 350 degrees Fahrenheit for 20 minutes or so. Stirring halfway through. Be sure to get the seeds on the sides especially. 

Let the seeds cool completely after removing from the oven then enjoy!